
Showing posts with label Cards. Show all posts
Showing posts with label Cards. Show all posts
Monday, August 4, 2014
Wish You Were Here swap
I created this postcard for the Yahoo group "All Things Tim" - Wish You Were Here swap. I used Salty Ocean and Peacock Feathers Distress inks for the background and Vintage Photo for the edges. The background behind the word Voyage is Peeled Paint and Vintage Photo. The stamps are from Classics #1 by Stampers Anonymous and the heart is Tim's Movers and Shapers Mini Hearts die covered with Barn Door ink and his washi tape. The photo is from my trip to Italy a few years ago (where I still have not finished uploading my photos to this blog!). I can't wait to see what other post cards I will get in return!

Wednesday, August 17, 2011
Stamping at the Lake
I had a few friends over for a day/weekend stamping at the Lake. I kicked my poor dad out for the night since I needed his bed and then a few of the ladies couldn't come and no one slept in his bed anyways! At least he had a nice breakfast out with my sister and her family. We all worked on projects that we each brought and then on Sunday with only 3 of us left, we certainly went to town on creating with whatever we had brought with us.... I came home with 11 cards of varying folds and techniques. Thank you ladies for making this such a fun weekend!
My contribution was an ATC (Artist Trading Card - same size as a baseball trading card) and a telescoping card. Both were basically copied from other artists whose blogs I follow from a Yahoo group called All Things Tim (as in Tim Holtz!). The ATC was basically copied from the blog Creative Expressions. Carol provided step by step instructions that even I could follow! I tried to use grungepaper as she suggested but did not get a very good impression from the embossing folder so I used a very heavy weight card stock instead. The second project that I brought had the ladies blessing me right and left! It was a telescoping card that I basically copied from Shelly Hickox and her blog Stamptramp. This is one of my favorite blogs to follow!
My contribution was an ATC (Artist Trading Card - same size as a baseball trading card) and a telescoping card. Both were basically copied from other artists whose blogs I follow from a Yahoo group called All Things Tim (as in Tim Holtz!). The ATC was basically copied from the blog Creative Expressions. Carol provided step by step instructions that even I could follow! I tried to use grungepaper as she suggested but did not get a very good impression from the embossing folder so I used a very heavy weight card stock instead.
 The second project that I brought had the ladies blessing me right and left! It was a telescoping card that I basically copied from Shelly Hickox and her blog Stamptramp. This is one of my favorite blogs to follow!
closed... opened...
 I used a variety of Tim Holtz products as well as coordinating stuff from other companies such as the friend stamp from Paperbag Studios and the gear die from Spellbinders called Sprightly Sprockets. The Tim Holtz products included acrylic paint daubers, stamps, and the big Weathered Clock die.
Tuesday, July 5, 2011
Cards for Dad
 These are the cards that I gave my dad for Father's Day and for his birthday this year. Usually he gets a 2 for 1 deal since his birthday is a few days after Father's Day but since I had the second one already made, I thought he would enjoy it too. The stamps are by PaperArtsy, Stampin' Up and Hero Arts. The filmstrip and mini staples are Tim Holtz products. I used double sided tape to adhere the film strip but it didn't stick! I'll have to try using glue dots next time. The sentiment and advert are popped up with 3d dots and the gentleman who looks like Derek Jeter is embossed in black.
The filmstrip is also a Tim Holtz product made by Sizzix. The photos are from my friends and family (I used my grandfather and cousin on an earlier ATC) and the gears is an embossing folder for the Cuttlebug. This second card I created for a shoebox project at the May 2011 CNY gathering in Syracuse. I am thinking of using a variation of the first card for my shoebox at the next stamping day in August!
Wednesday, June 23, 2010
Baby shower card

My dilemma for this baby shower card was how I could incorporate my style instead of "cutsie". I started by running a piece of Stampin' Up Mellow Moss card stock through the Cuttlebug and embossing with the Diamonds in the Rough folder inked with Mellow Moss. I then swiped the tops of the diamonds with So Saffron ink. Also from Stampin' Up are the ribbon and saying (Happy Harmony set). The Suzys Zoo duck was watercolored, cut out and popped up with 3d dots. The 2 flowers are a Tim Holtz die run through the Cuttlebug and painted with Radiant Peals paint.
Tuesday, June 22, 2010
Sticking with the baby theme...
I created this card for the Western New York stamp gathering in Buffalo this past May. I know for a fact that my table mates were swearing a blue streak at me trying to get the baby stamps glued in behind the "film strip"! Many of them use a tape runner, while I use gel glue and of course I didn't think of that when I set out my project or I would have included gel glue for their use! I think they all loved the card anyways (at least I did!).
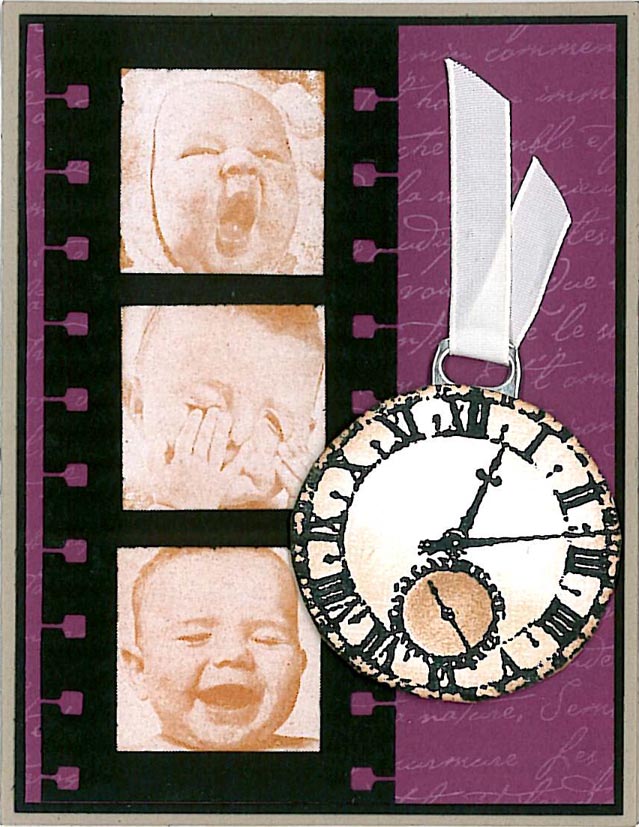
I started with Stampin' Up Rich Razzleberry card stock and stamped it with the French Script background in white ink. The "film strip" is black card stock that I punched using a square punch and SU's spiral punch. The babies are stamped on glossy white card stock in Archival Sepia ink using the Stampsmith's unmounted set "Ooh Baby". The clock stamp is by Tim Holtz and is stamped in black ink on white textured card stock. I sponged the edges with the Sepia ink. I glued a soda tab on the back, popped the whole thing up with 3d dots and add the ribbon as a watch fob.
I gave this one to my brother for his 50th birthday!
Tuesday, March 31, 2009
CNY February 2009 shoebox
 This is my "shoebox" project for the CNY stamping day in Maine, NY. All the materials are from Stampin' Up except the yarn (which I got at the dollar store - gotta love that!).
I started by cutting 3 sets of tags, the off white a bit smaller than the black. I stamped the tree image from "Lovely as a Tree" set with Handsome Hunter ink.
The background is Really Rust card stock that I stamped with the Print Pattern background stamp dipped in bleach. I then stamped with French Script using Chocolate Chip ink. I cut the background into 2 different size strips and glued them onto Chocolate Chip card stock.
Assemble the tags and glue down as pictured and you are done! This makes a really nice masculine card for any occasion.
A tip on bleaching - make sure you rinse your rubber stamp off as soon as you are done stamping so as not to damage the rubber. Also, a well ventilated stamping area is probably a good idea too!
Monday, November 10, 2008
CNY November 2008 shoebox swap

This is the card that I created for the SplitCoastStampers CNY November 2008 shoebox swap. My Stampin' Up demo, Joanne Tofte, demonstrated this template to us at an SU party. You can see another version on her blog. The card stands up like a teepee when open and folds flat to fit in a standard envelope.
Supplies:
2 4" square white card stock
1 4" square green card stock
1/2 3.75" square green card stock (cut on diagonal)
2"x3" white card stock
green ink
white ink
Versa Mark ink
Stampin' Up label punch
Stampin' Up Snow Swirled stamp set
2 silver brads
silver glitter embossing powder
Stamp-a-ma-jig

 1. Stamp the two white 4" square card stock with snowflake stamps in green ink and stamp the 4" green square card stock with snowflake stamps in white ink.
2. Fold each 4" square card stock in half on the diagonal.
3. Glue the left half of the green square on top to the right half of the white square.
4. Glue the left half of the other white square on top to the right half of the green square.
 5. Using the Stamp-a-ma-jig to line up the image with the long side of the card stock to the right, stamp the Christmas tree with VersaMark ink and emboss with silver glitter embossing powder.
6. Glue the green triangle to the front of the 2nd 4" square white card stock.
7. Stamp the word 'Joy' to the 2"x3" white card stock in green ink and punch out with SU label punch. Sponge green ink on edges and place silver brads on each end. Glue to front under tree.
8. Slit the back of the 1st 4" square white card stock to receive the right point of the 2nd 4" square white card stock so card will stand up like a teepee.

Wednesday, July 30, 2008
Aidan's birthday card


This is the birthday card that I created for my nephew, Aidan, for his 14th birthday. He was very disappointed when I told him that the ticket was only a decoration! He liked the card so much that he said he wanted to keep it!
The stamps are from Cornish Heritage Farms, Purple Onion Designs, TooMuchFun Rubberstamps, and Stampin' Up.
Tuesday, June 3, 2008
Faux Pocket Challenge
 Here is the Faux Pocket Challenge card that I created from last Saturday's day of stamping fun! I brought 4 packets that included the precut cardstock and string that everyone had to use though they could use whatever else was handy in Diane's amazing stamping stash to finish their card. We all have such different tastes and of course we were all drooling over what the other's came up with! Here is the links to everyone's cards...
Diane
Jenn
Judy
This is the inside - as you can see, it is a Sweet 16 card that I will be giving to my Goddaughter (hopefully she won't see this before tomorrow!). She will cringe at the "Sweet" part so I tried to grunge it up a bit.
 I used Stampin' Up cardstock (Chocolate Chip, Bliss Blue and Whisper White), Filigree background stamp, ink (Chocolate Chip and Brocade Blue), spiral and tab punches; Flourishes clear stamps, numbers stamps from Purple Onion Designs and two different size square punches.
Monday, June 2, 2008
Stamping fun at Diane's!
Judy, Jenn and I spent the day stamping with Diane at her house on Saturday - what fun! We each brought a project for the others to stamp then Judy had an extra project for us to do that she had left over from the last SplitCoast Central New York gathering in Syracuse. I also brought along a "challenge" packet where you had to use everything in the packet but could raid Diane's mega stash of stuff. We are all going to post that challenge tomorrow so you can compare them! Diane wanted to play with her new Cuttlebug 3x3 Combo Rose Frame so we made a very elegant card that I will save for someone's wedding or anniversary - very classy. Last but not least, we created four cards (one for each of us of course!) by Round Robin. Jenn started then passed the cards on to me, then on to Judy, then Diane and around again to create this....

We used Stampin' Up card stock (Gable Green, Only Orange, Tempting Turquoise, and White), punches and stamps. The saying is Tim Holtz's from Stampers Anonymous. The stem is corrugated and the center of the petals is a Prima flower. Cuuute!

We used Stampin' Up card stock (Gable Green, Only Orange, Tempting Turquoise, and White), punches and stamps. The saying is Tim Holtz's from Stampers Anonymous. The stem is corrugated and the center of the petals is a Prima flower. Cuuute!
Wednesday, May 7, 2008
Where have I been?
Oops! I see I haven't posted in a while! I am finally healthy (knocking on wood) and am keeping busy. I was a judge for Odyssey of the Mind both in my region and for the New York State finals. They are always looking for more judges if you want to join me!
My friend Judy held a tutorial at her house for 3 of us to create a Jacob's Ladder out of 4"x4" coasters. I only put the background paper on it so far - eventually, I'll put some photos and whatnot on to finish it! (Judy - you need to post your example!)
I went to another stained glass class and used my microscope slides to create a pendant. Naturally, I have no idea where I put it so you can't see a picture of it! One of the other girls created a panel that was just gorgeous! She used shades of green glass and then put a patina on the solder to turn it black. I may have to make one for myself!
On April 26th, my friend Diane and I drove to Ransomville (north of Buffalo) to attend the first Western New York stamping day. Here is my ATC that I created for this gathering and for a Grunge swap through SplitCoast...
My friend Judy held a tutorial at her house for 3 of us to create a Jacob's Ladder out of 4"x4" coasters. I only put the background paper on it so far - eventually, I'll put some photos and whatnot on to finish it! (Judy - you need to post your example!)
I went to another stained glass class and used my microscope slides to create a pendant. Naturally, I have no idea where I put it so you can't see a picture of it! One of the other girls created a panel that was just gorgeous! She used shades of green glass and then put a patina on the solder to turn it black. I may have to make one for myself!
On April 26th, my friend Diane and I drove to Ransomville (north of Buffalo) to attend the first Western New York stamping day. Here is my ATC that I created for this gathering and for a Grunge swap through SplitCoast...


This is the shoebox project that I created for my table to put together...

I used a microscope slide for the base and I used background papers I created with alcohol inks for the punched out flowers. The third flower is just punched from Basic Grey patterned card stock. The background and Happy Birthday stamps are from Stampin' Up. I used Stickles and silver beads for the center of the flowers.
Friday, January 4, 2008
Manila File Folder Album

This "album" is actually a birthday card I made for my friend, Judy, from a folded manila file folder. I really enjoy making interactive cards and that really poses a challenge when I make ATC's that are only 2.5"x3.5"! This card is oversized and is quite easy to make - just follow along with the instructions from TayloredExpressions.

The tags slide out and Judy can add her favorite photos to each one. I changed this from an accordian album to a "book" album by using double sided tape on the back fold. I love the vintage feel to this which seems to be my current trend - distress everything!

I used 6"x6" Basic Grey papers, 12"x12" Old World Paper Stack, and Stampin' Up Chocolate Chip 8.5"x11" cardstock. Go to the A.C. Moore web site to print out their current coupon and then go buy some of these amazing papers!! I used Stampin' Up Chocolate Chip ink with stamps from Paperbag Studios, Autumn Leaves Clear Stamps and Stampin' Up.
Wednesday, November 7, 2007
Dragonflies

I created this card for my shoebox for the February gathering of Central New York stampers. I used Stampin' Up stamps Measure of a Life, Print Pattern, French Script, and Warmest Regards. The dragonfly was colored with watercolor pencils and then blended with water.

This is the Artist Trading Card that I created for the ATC swap. I used the same stamp but cut it closer and used Twinkling H2O's for a much richer color palette. This is my favorite ATC so far!
Friday, November 2, 2007
Best Blossoms

This is my shoebox project for the May gathering of CNY stampers. I used Stampin' Up's Best Blossoms set and colors that are not normal for me! The two large flowers were inked using the Rock and Roll technique to give them more color. One of these flowers is popped up with a 3d foam dot to give it more definition/dimension. I always create a "how to" direction sheet and get a kick out of watching other stampers ignore the directions and go their own way. Some turn out fantastic and others I just shrug and point at the direction sheet - doh! My friend, Judy, gets exasperated at me when I forget to look at the directions for her shoebox - I eventually get there in the end!
Judy's mom taught us how to Tole paint which uses outlines to follow.....needless to say no two projects ended up the same! They always reflected our own personalities though and isn't that what it is all about anyways?!
Thursday, November 1, 2007
Spinner Card

Recently, I got together with 39 other stamping fanatics at the sixth Central New York stamping gathering in Syracuse. We all have to prepare a shoebox that included all of the components for everyone at your table to make your card. I brought along a Spinner Card. I embossed the white background with a Cuttlebug and then used a brayer to add Versamark to the raised floral design. I used to chalks to give the design its color. The butterfly image is a retired stamp from Stampin' Up and I painted it with Twinkling H2O's to give it some shimmer when it spins!
Subscribe to:
Posts (Atom)